
First, here's the disclaimers...I don't work for Big Green Egg, nor do I represent them in any way, shape or form. I just happen to like their cookers a LOT! Secondly, always, always, ALWAYS defer to any information Big Green Egg gives you regarding their products, even if it goes against any info I have posted here on my site. After all, they ARE the manufacturer. Lastly, I take no responsibility for what you do with the info contained herein on this site. If your food doesn't turn out right, or (God forbid) you burn yourself or worse while following one of my recipes, that's on you.
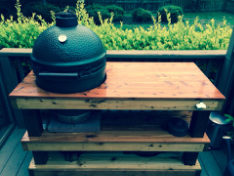
Before we go any further, I think it would be good to familiarize ourselves with certain terms that I'll be using and/or referring to here on the website. For example: for those who aren't familiar with Big Green Eggs, here's a picture of mine. It's the large size (they currently come in six different sizes), which is quite sufficient to take care of my normal outdoor cooking requirements. It lives in a custom built cedar table that's on wheels, and it has a cover over it when it's not in use. Additionally, I've made some additions to it, such as installing a stainless steel bottle opener on the front, a BBQ tool rack on the left-hand side for all my necessary cooking accouterments, and an umbrella holder on the back.
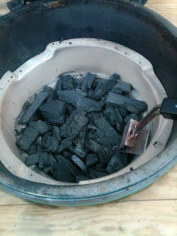
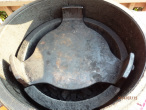
As you might expect, when you open the Egg (without any of the parts inside it), it looks like an empty Egg. However, put the "guts" in, and you have the makings of a first class trip to Flavor Town! Let's go inside the Egg, and start from the bottom up with the Ceramic Firebox (white colored cylinder with charcoal inside it in the picture), along with the cast iron Fire Grate, which goes in the bottom of the firebox. The firebox is where you load the lump hardwood charcoal (no briquettes!). It has round holes in the sides towards the bottom and in the fire grate for air flow to fuel the fire, as well as a saw cut from top to bottom in the fire grate to help with expansion as it heats up and contraction as it cools down. That vertical saw cut is meant to line up with the front of the Egg, where the lower draft door is (see the next picture below). In starting the hardwood lump charcoal, never, never, NEVER use lighter fluid. You don't want your food to taste like fuel! Rather, use an electric starter (as shown in the photo), or you can use fire starter cubes or squares. More on that shortly.

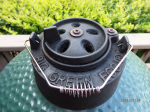
The Big Green Egg utilizes both an upper and lower vent to create air flow, which work in tandem to keep the charcoal burning. Both vents can be adjusted to regulate the temperature to the desired level. The thing to remember here is, once you get to the temp you want, the Egg is GREAT at holding said temp for several hours, if need be (this comes in very handy in smoking meats "low & slow"). The photo to the left shows the lower vent in the full open position. Also, there is a second inner screen door on this lower vent that can be opened, as well. This "screen door" helps keep sparks inside the Egg when closed, and it also facilitates the process of cleaning out ash when opened.
Here's the top vent (referred to by Big Green Egg as the Dual Function Metal Top). The "dual function" moniker is an accurate term for this device. Not only can you open or close it (or put it somewhere in between), but you can also dial in the top portion of the vent to make micro adjustments to attain the desired temperature. Again, as mentioned previously, both the the upper and lower vents work in tandem to create the desired temperature.
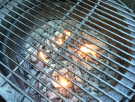
Let's talk cooking methods. Specifically, we'll use the terms direct cooking and indirect cooking. Direct cooking means you're cooking directly over the charcoal, with nothing in between it and the meat on the grate (think grilling chicken, burgers or steaks at medium at higher temps). The picture to the left demonstrates direct cooking on the Egg.
Indirect cooking involves the use of a Plate Setter or similar accessory to provide a heat-directing barrier between the food and the fire (think "low & slow" cooking, as in smoking meats). Again, the Big Green Egg can do both these cooking methods and more! The picture to the left shows the use of a plate setter. You can also put a metal drip pan on top of the plate setter. NOTE - the cooking grid will go on top of the plate setter (cooking grid not shown).
As you look over the recipes section of the website, you'll notice I will mention in each recipe which method of cooking is required (sometimes, it's both!).
Finally, let's move on to getting your fire started. As mentioned above, you want to use ONLY hardwood lump charcoal in your Egg, AND you only want to use an electric starter OR fire starter cubes or squares to get the fire lit. Put enough charcoal in the Egg to bring it to the top of the fire box. Follow the manufacturer's directions for whichever method you choose. Additionally, when starting your fire, you'll want to open the lower vent on the Egg all the way, and open the top of the Egg all the way, as well. When any flame has gone away and you're getting glowing embers that are turning white, you're ready to put the cooking grate in place, close the top and start dialing in the vents to get to the desired temperature. Once you do all that, it's time to cook!